SSL certificate and nginx config
1300 Words | Read in about 6 Min | View times
HTTP, as an application layer protocol, remains focused on presenting information, but cares less about the way this information travels from one place to another. Unfortunaly, this means that HTTP can be intercepted and potentially altered, making both the information and the information receiver vulnerable.
HTTPS protocol is an extension for HTTP. That “S” stands for Secure and it is powered by Transport Layer Secrurity(TLS), the succesor to Secure Sockets Layer(SSL). The standard security technology that established and ecrypted connection between a web server and a browser.
This post is about to introduce how to create a SSL cetificate by yourself and apply it in nginx.
What’s CA?
A certificate authority (CA) is a trusted entity that issues SSL cerfiticates. These digital certificates are data files used to cryptographically link an entity with a public key. Web browsers use them to authenticate content sent from web servers, ensuring trust in content delivered online.
As providers of these certificates, CAs are a reliable and critical trust anchor of the internet’s public key infrastructure(PKI). They help secure the internet for both organizations and users.
A CA plays multiple crucial roles:
-
issues digital certificates
-
helps establish trust between communicating entities over the internet
-
verifies domain names and organizations to validate their identities
-
maintains certificate revocation lists.
CA issue trusted root certificates who are included in trust stores. The digital certificates that are signed with the root private key are trusted by all devices and applications whose trust store includes the root certificates. Thus, a chain of trust is created which is used to authenticate organizations.
A digital certificate contains information about the entity to which it has been issued. Typically, that includes its name, contact information, organization, domain name, public key, certificate issue and expiry date, and more. The name of the issuing CA and its digital signature are also normally included in the digital certificate.
In the digital certificate, the digital signature proves that a trusted CA issued the certificate and it was not modified by any other party.
How a CA issues a digital certificate?
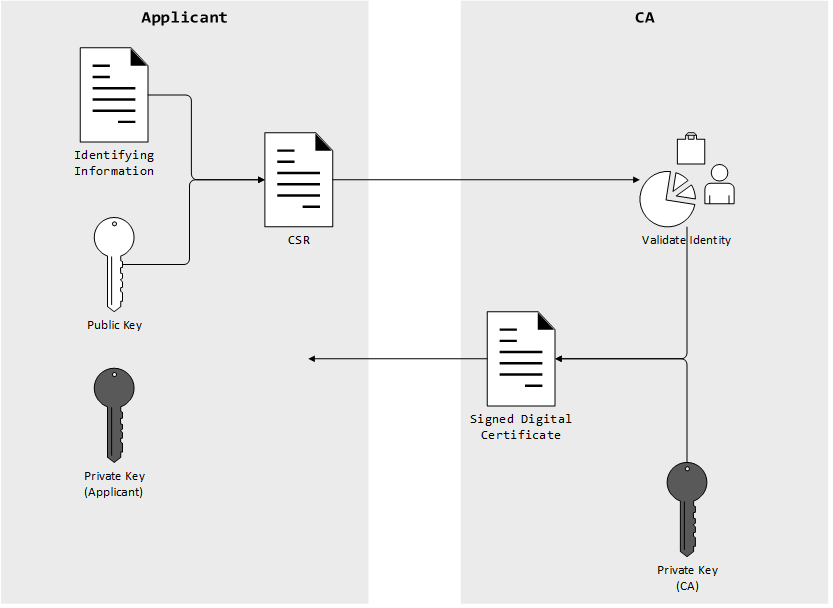
There are 3 steps to issuse a digital certificate by CA:
-
Applicant generates a key pair consisting of a private key and a public key
-
Applicant generates a Certificate Secure Request(CSR) file, send it to CA
-
CA verifies information contains in CSR, and digitally signs the certificate with an issuing private key, send it back to the applicant.
A CSR is an encoded text file that includes the public key and other information that will be included in the certificate (e.g. domain name, organization, email address, etc.). Key pair and CSR generation are usually done on the applicant server where the certificate will be installed. The applicant’s private key is kept secure and should never shown to the CA or anyone else.
When the signed certificate is presented to a third party, the recipient can cryptographically confirm the CA’s digital signature via the CA’s public key. Additionally, the recipient can use the certificate to confirm that signed content was sent by someone in possession of the corresponding private key, and the information has not been altered since it was signed.

Self-signed root CA certificate
A self-signed certificate is one that is not signed by a CA at all – neither private nor public. In this case, the certificate is signed with its own private key, instead of requesting it from a public or a private CA.
As the fact that a self-signed certificate with the corresponding private key can be used to simulate a CA. Once this certificate is included in trust stores, all digital certificate issued by this self-signed certificate will be trusted in this system. This is why a client is asked to install a CA certificate in its system but not the digital certificate itself.
Install CA certificate under Windows
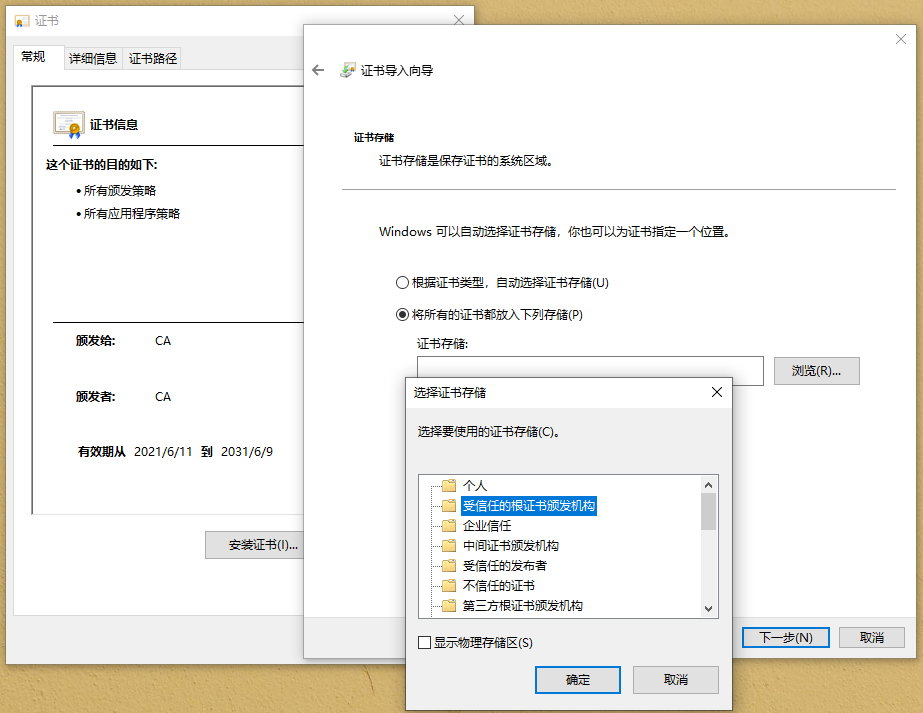
Double click the digital certificate -> Install -> Local matchine -> Next -> Place all certificates in the following store -> Trusted Root Certificate Authorities

Install CA certificate under Linux
- Copy the CA certificate to
/usr/share/ca-certificates/extra
1$ sudo mkdir /usr/share/ca-certificates/extra
2$ sudo cp ca.crt /usr/share/ca-certificates/extra
- Add path to config file
1$ sudo vim /etc/ca-certificates.conf
2
3# Add this line at the end of conf
4extra/ca.crt
- Update CA list
1$ sudo update-ca-certificates
After install the CA certificate, it can issue digital certificate with CSR now. And the digital certificate can be used in the applicant servers.
Create a custom CA certificate
- Create a CA private key
1$ openssl genrsa -out ca.key 2048
- Generate self-signed CA certificate
1$ openssl req -new -x509 -days 3650 -key ca.key -subj "/C=CN/ST=BJ/L=BJ/O=MyCA/CN=CA" -out ca.crt
It means the CA organization name is MyCA and it will expire in 10 years.
Issues a server digital certificate by custom CA
- Create a server private key
1$ openssl genrsa -out server.key 2048
- Create a CSR file
1$ openssl req -newkey rsa:2048 -nodes -keyout server.key -subj "/C=CN/ST=BJ/L=BJ/O=Kiwifruit Studio/CN=<YOUR_IP or YOUR_DOMAIN>" -out server.csr
Notice: Replace the Ip address or domain name for your own
- CA issue a digital certificate with SAN
1$ openssl x509 -req -extfile <(printf "subjectAltName=IP:<YOUR_IP>[,DNS:<YOUR_DOMAIN>,...]") -days 3650 -in server.csr -CA ca.crt -CAkey ca.key -CAcreateserial -out server.crt
Subject Alternative Name(SAN) is an extension for SSL standard X509. A SAN or subject alternative name is a structured way to indicate all of the domain names and IP addresses that are secured by the certificate. Included on the short list of items that are considered a SAN are subdomains and IP addresses.
Modern web browsers and operating system supports X509 standard. If the certifcate does not contain SAN information, an error “x509: certificate signed by unknown authority” will be shown.
- Display certificate information
1$ openssl x509 -text -noout -in server.crt
After that, the server digital certificate server.crt is available to be used.
Apply digital certificate in nginx
NGINX is open source software for web serving, reverse proxying, caching, load balancing, media streaming, and more.
We can apply the digital certificate in the nginx to support HTTPS.
Config reverse proxying
- Create a custom config
login.confin/etc/nginx/config.d
 1upstream mylogin {
 2        server 127.0.0.1:6679;
 3        server 127.0.0.1:6680;
 4}
 5
 6server {
 7        listen 8888;
 8        server_name localhost;
 9
10        location / {
11                proxy_pass http://mylogin;
12                proxy_set_header Host $host;
13                proxy_set_header X-Real-IP $remote_addr;
14                proxy_set_header X-Forwarded-For $proxy_add_x_forwarded_for;
15        }
16}
17
The server is listening on port 8888, which proxying between 127.0.0.1:6679 and 127.0.0.1:6680 for load balance.
Config certificate
- Edit the
login.conf
 1upstream mylogin {
 2        server 127.0.0.1:6679;
 3        server 127.0.0.1:6680;
 4}
 5
 6server {
 7        listen 8888;
 8        listen 443 ssl;
 9        server_name localhost;
10
11        ssl_certificate /home/zhxilin/dev/mycert/server.crt;
12        ssl_certificate_key /home/zhxilin/dev/mycert/server.key;
13
14        ssl_session_cache shared:SSL:10m;
15        ssl_session_timeout 10m;
16
17        ssl_protocols TLSv1 TLSv1.1 TLSv1.2;
18        ssl_ciphers HIGH:!aNULL:!MD5;
19        ssl_prefer_server_ciphers on;
20
21        if ($scheme = http) {
22                return 308 https://$host$request_uri;
23        }
24
25        location / {
26                proxy_pass http://mylogin;
27                proxy_set_header Host $host;
28                proxy_set_header X-Real-IP $remote_addr;
29                proxy_set_header X-Forwarded-For $proxy_add_x_forwarded_for;
30        }
31}
The 443 port is used for HTTPS now. Additionally, the origin request on the port 8888 will auto redirect to port 443.
See more for HTTP redirection 301, 302, 303, 307, and 308: Which HTTP Redirect Status Code is for What?
Restart nginx server
- First check the config
1$ sudo nginx -t
- Then reload the config without restart
1$ sudo nginx -s reload
Now we can access to https://<YOUR_DOMAIN>/login in HTTPS.
Notice: Since the digital certificate is issued by a custom CA, the CA certificate
ca.crtis required to install on that client device.